ماژول افزاینده کاهنده ولتاژ ZK-4KX

ZK-4KX module

7374-264-11668

625,620 تومان
کالا موجود است
موجودی انبار : 28 عدد


خرید کالا


علاقه مندان : 1 نفر
وضعیت : فعال

تعداد مرجوعی : 0
دنبال کنندگان : 5 نفر

قدمت : 1 سال و 10 ماه و 25 روز
وزن : 94 گرم

کل فروش : 72 عدد
تعداد سفارش ها : 52 سفارش

هنوز هیچ رایی ثبت نشده است
ماژول افزاینده کاهنده ولتاژ ZK-4KX با ولتاژ قابل تنظیم خروجی 0.5 تا 30 ولت
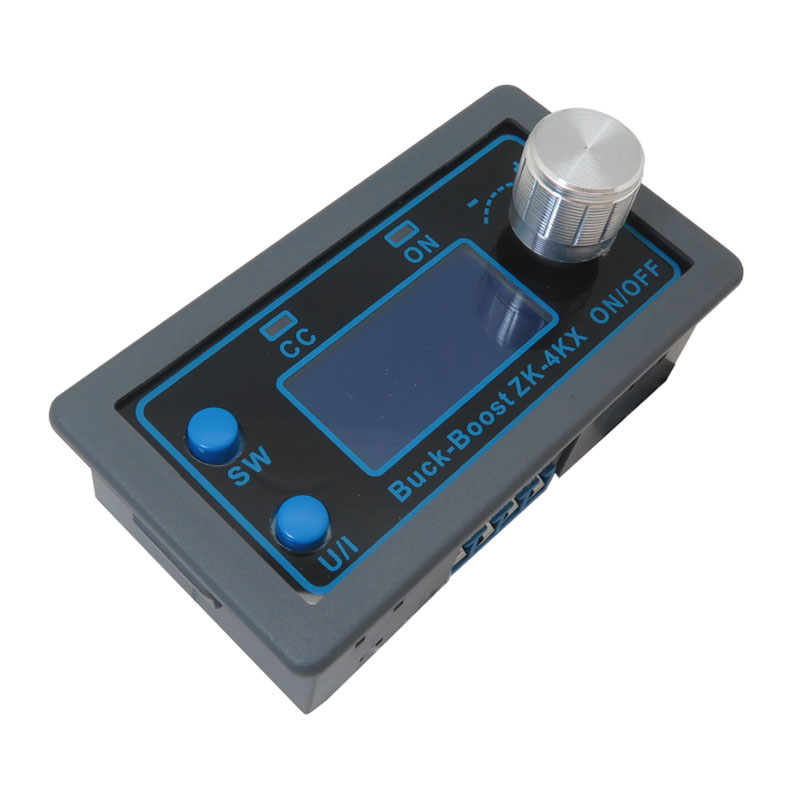
ماژول افزاینده کاهنده ولتاژ ZK-4KX یک مبدل ولتاژ DC به DC است. ولتاژ ورودی این مبدل افزاینده و کاهنده ولتاژ در محدوده 5 تا 30 ولت می باشد. ولتاژ خروجی آن با سرعت و دقت بین 0.5 تا 30 ولت قابل تنظیم است در حالی که جریان خروجی بین 0 تا 4 آمپر محدود می شود. این مبدل ولتاژ دارای یک LCD است که می تواند ولتاژ ورودی/خروجی، جریان خروجی، توان خروجی، ظرفیت خروجی، زمان خروجی را به خوبی نمایش دهد. مبدل افزاینده و کاهنده ولتاژ ZK-4KX در برابر وارونگی پلاریته ورودی ایمن است و نمی سوزد. در این مبدل ولتاژ ریپل خروجی بسیار کوچک است و فیلتر پی وجود دارد. وقتی پارامترهای کاری مبدل ولتاژ ZK-4KX از حد مجاز تجاوز می کنند خروجی بطور خودکار بسته می شود. پره های رادیاتور ضخیم باعث می شوند پراکندگی حرارت به سرعت صورت بگیرد و عمر دستگاه افزایش یابد.


نحوه استفاده از ماژول:

  1.  تغییر پارامترهای نمایشگر : در رابط معمولی، SW را کوتاه فشار دهید تا نمایشگر پایینی نمایشگر تغییر کند، و محتوای نمایشگر بین A فعلی، توان W، ظرفیت Ah و زمان h تغییر می‌کند. دکمه SW را به مدت طولانی فشار دهید تا صفحه نمایش بالایی نمایشگر تغییر کند و محتوای نمایشگر بین ولتاژ ورودی IN و ولتاژ خروجی سوئیچ می شود.
  2. تنظیم مقدار ولتاژ خروجی: دکمه U/I را در رابط معمولی فشار دهید تا وارد رابط ولتاژ تنظیم و جریان ثابت شوید. مشاهده می شود که یک رقم مشخص از مقدار ولتاژ خروجی تنظیم شده چشمک می زند، انکودر چرخشی را به چپ و راست بچرخانید و می توان آن را برای افزایش یا کاهش تنظیم کرد. برای انتخاب بیتی از ولتاژ خروجی برای تنظیم، رمزگذار چرخشی را کوتاه فشار دهید. پس از تکمیل تنظیمات، دکمه U/I را دوبار فشار دهید تا به رابط عادی بازگردید. یا بعد از توقف 10 ثانیه ای، به طور خودکار به رابط عادی باز می گردد.
  3. تنظیم مقدار جریان ثابت: دکمه U/I را در رابط معمولی فشار دهید تا وارد ولتاژ تنظیم و رابط جریان ثابت شوید. دکمه U/I را دوباره فشار دهید تا مقدار جریان ثابت را تنظیم کنید. می بینید که یک رقم مشخص از مقدار جریان ثابت چشمک می زند. برای تنظیم مقدار، رمزگذار چرخشی را به چپ و راست بچرخانید. برای انتخاب بیتی از مقدار جریان ثابت، رمزگذار چرخشی را به طور کوتاه فشار دهید. پس از اتمام تنظیمات، دکمه U/I را برای خروج از رابط ولتاژ و جریان ثابت و بازگشت به رابط عادی فشار دهید. یا بعد از توقف 10 ثانیه ای، به طور خودکار به رابط عادی باز می گردد.
  4. تنظیم روشن یا خاموش بودن ماژول: دکمه U/I را در رابط معمولی فشار دهید تا وارد رابط تنظیمات پارامتر شوید. می توان دید که OPEN OFF یا OPEN ON. OPEN OFF به این معنی است که هنگام روشن شدن، خروجی به طور پیش‌فرض خاموش می‌شود و OPEN ON به این معنی است که هنگام روشن شدن، خروجی به‌طور پیش‌فرض روشن می‌شود. برای جابجایی بین دو حالت، رمزگذار چرخشی را به مدت طولانی فشار دهید. پس از تکمیل تنظیمات، دکمه U/I را به مدت طولانی فشار دهید تا به رابط عادی بازگردید.
  5. تنظیم پارامتر حفاظتی حالت باز و آستانه : دکمه U/I را در رابط معمولی فشار دهید تا وارد رابط تنظیمات پارامتر شوید. دکمه SW را فشار دهید تا پارامتر حفاظتی که می خواهید تنظیم کنید ظاهر شود. LUP—— آستانه حفاظت در برابر ولتاژ پایین؛ OUP—— آستانه حفاظت از اضافه ولتاژ؛ OCP—— آستانه حفاظت در برابر جریان اضافه؛ OPP—— آستانه حفاظت بیش از حد؛ OAP——آستانه حفاظتی مازاد ظرفیت؛ آستانه حفاظت از مهلت OHP. OTP—— آستانه حفاظت از دمای بیش از حد. برای انتخاب رقمی از پارامتر حفاظتی که می‌خواهید تنظیم کنید، رمزگذار چرخشی را کوتاه فشار دهید. رمزگذار چرخشی را به مدت طولانی فشار دهید تا پارامتر حفاظت را روشن یا خاموش کنید (فقط حفاظت در زمان وقفه و حفاظت از ظرفیت اضافی می‌تواند روشن/خاموش باشد، سایر پارامترهای حفاظتی به طور پیش‌فرض فعال هستند). چرخش رمزگذار به چپ و راست می تواند پارامتر را بزرگتر و کوچکتر کند. پس از تکمیل تنظیمات، دکمه U/I را به مدت طولانی فشار دهید تا به رابط عادی بازگردید.
  6. کالیبره کردن ولتاژ و جریان: دکمه U/I را در رابط معمولی فشار دهید تا وارد رابط تنظیمات پارامتر شوید. دکمه SW را فشار دهید تا رابط پارامتر با CAL ظاهر شود. نماد CAL+IN+V رابط ولتاژ ورودی کالیبراسیون است. نماد CAL+OUT+V رابط ولتاژ خروجی کالیبراسیون است. نماد CAL+OUT+A رابط جریان خروجی کالیبراسیون است. برای تنظیم اندازه پارامتر انکدر را به چپ و راست بچرخانید. پس از اتمام تنظیم، انکدر چرخشی را به مدت طولانی فشار دهید تا تأیید کنید که تنظیم کامل شده است و مقدار پارامتر در این زمان چشمک نمی زند. دکمه U/I را به مدت طولانی فشار دهید تا به رابط عادی بازگردید.

کاربرد ماژول باک بوست ZK-4KX:

  1. شارژ باتری خورشیدی
  2. کاربرد صنعتی
  3. منابع تغذیه

مشخصات ماژول باک بوست ZK-4KX:

  1. ولتاژ ورودی: 5.5 تا 30 ولت
  2. ولتاژ خروجی: 0.5 تا 30 ولت
  3. حداکثر جریان خروجی: 4 آمپر
  4. بازدهی:  88 درصد
  5. دقت رگولاسیون ولتاژ: 0.01V
  6. دقت رکولاسیون جریان: 0.001A
  7. حداکثر جریان خروجی: 4 آمپر
  8. شروع با راه اندازی نرم
  9. فرکانس کار: 180KHZ
  10. ابعاد: 79mm*43mm*26mm
  11. وزن: 92 گرم
  12. محافظت در برابر ولتاژ بالا
  13. محافظت در برابر جریان بالا
  14. محافظت در برابر ورودی معکوس
  15. محافظت در برابر دمای بالا

مستندات:
ماژول منبع تغذیه ZK-4KX


Description:
LCD can display input/output voltage, output current/output power/output capacity/output time; CNC adjustment, accurate and fast, can boost and lower voltage, output voltage can be adjusted at will from 0.5-30v, limit current 0-4a can be adjusted at will.

Anti-reverse connection protection of input end, which will not burn out. Anti-reverse irrigation at the output end, no additional anti-reverse irrigation diode is needed to charge the battery.
The module can be set to open/close by default. Multiple software protection mechanisms are available, and the protection threshold is adjustable.When the working parameters of the module exceed the protection threshold, the output will be automatically closed.
Output ripple is small and PI filter is available.

Application:
photovoltaic charger
industrial supplies
power supply module

Features:
 Input voltage: 5.0-30v
Output voltage: 0.5-30v
Output current: can work stably at 3A for a long time, and can reach 4A under enhanced heat dissipation
Output power: natural heat dissipation 35W, strengthen heat dissipation 50W
Voltage display resolution: 0.01V
Current display resolution: 0.001A
Conversion efficiency: about 88%
Soft start: yes (with high power and load module may fail when starting)

Protection mechanism:
Input anti-reverse connection;
Output anti-reverse irrigation;
Input undervoltage protection (4.8-30v adjustable, default 4.8v)
Output overvoltage protection (0.5-31v adjustable, default 31V)
Output overcurrent protection 0-4.1a (adjustable, default 4.1a)
Overpower protection (0-50w adjustable, default 50W)
Overtemperature protection (80-110° adjustable, default 110°)
Timeout protection (0-100h adjustable, off by default)
Super capacity protection (0-60ah adjustable, off by default)
Operating frequency: 180KHZ
Dimensions: length * width * height 79mm*43mm*26mm
Weight: 92g

How to use:
1. Switch display parameters - in the normal interface, short press SW to switch the lower display of the display, and the display content switches between current A, power W, capacity Ah, and time h. Long press the SW button to switch the upper display of the display, and the display content switches between the input voltage IN and the output voltage OUT.

2. Set the output voltage value - short press the U/I button in the normal interface to enter the setting voltage and constant current interface. It can be seen that a certain digit of the set output voltage value is flashing, turn the rotary encoder left and right, and it can be adjusted to increase or decrease. Short press the rotary encoder to choose which bit of the output voltage to set. After the setting is completed, short press the U/I button twice to return to the normal interface. Or after stopping the operation for 10s, it will automatically return to the normal interface.

3. Set the constant current value (that is, the maximum current value that the module allows to output) - short press the U/I button in the normal interface to enter the setting voltage and constant current interface. Short press the U/I button again to switch to setting the constant current value. You can see that a certain digit of the constant current value is flashing. Turn the rotary encoder left and right to adjust the value. Short press the rotary encoder to choose which bit of the constant current value to set. After the setting is completed, short press the U/I button to exit the setting voltage and constant current interface and return to the normal interface. Or after stopping the operation for 10s, it will automatically return to the normal interface.

4. Set the module to be on/off by default on power -on - long press the U/I button in the normal interface to enter the parameter setting interface. It can be seen that OPEN OFF or OPEN ON. OPEN OFF means the output is turned off by default when power on, and OPEN ON means the output is turned on by default when it is powered on. Long press the rotary encoder to switch between two states. After the setting is completed, long press the U/I button to return to the normal interface.

5. Set the protection parameter open state and threshold - long press the U/I button in the normal interface to enter the parameter setting interface. Short press the SW button until the protection parameter you want to set appears. LUP——undervoltage protection threshold; OUP——overvoltage protection threshold; OCP——overcurrent protection threshold; OPP——overpower protection threshold; OAP——overcapacity protection threshold; OHP timeout protection threshold; OTP——overtemperature Protection threshold. Short press the rotary encoder to select which digit of the protection parameter you want to set. Long press the rotary encoder to set the protection parameter on or off (only the timeout protection and overcapacity protection can be set to be on/off, other protection parameters are enabled by default.). Rotating the encoder left and right can make the parameter bigger and smaller. After the setting is completed, long press the U/I button to return to the normal interface.

6. Calibrate voltage and current - long press the U/I button in the normal interface to enter the parameter setting interface. Short press the SW button until the parameter interface with CAL appears. The one with CAL+IN+V symbol is the calibration input voltage interface; the one with CAL+OUT+V symbol is the calibration output voltage interface; the one with CAL+OUT+A symbol is the calibration output current interface. Rotate the encoder left and right to adjust the parameter size. After the adjustment is completed, long press the rotary encoder to confirm that the adjustment is completed, and the parameter value is not flashing at this time. Long press the U/I button to return to the normal interface.